While every Mac device comes with a microphone that’s built into the product, you’ll also find another port for audio input and output—the headphone jack. That is, of course, until Apple decides to make it a pricy add-on feature!
Until that time comes, however, you can use this port to connect line-in audio input devices like external microphones to your Mac. macOS allows you to switch the purpose of the headphone jack to accept input devices, as well as set any attached device as the default input device.
Here’s how to use audio line-in audio input devices on macOS.

What Is Line In Audio?
A line-in audio jack on a device allows you to input sounds to that device. This is in contrast to the typical audio-out (or line-out) jack, which you might use to play sounds from your PC on external devices like a speaker system.
You may also have a mic-in jack on your PC. This is typically a weaker version of a normal line-in jack, as the input levels on a mic are usually at a much lower level than other types of input devices like audio amplifiers. Standard line-in jacks can also be labeled mic-in—there isn’t much difference between them.

On a Mac, you don’t really need to worry about the distinction, either way. Older Mac devices had a separate line-in jack for you to use for all audio input devices (including external microphones) and an audio-out jack for headphones and speakers. This has been reduced to a single, switchable jack in modern Macs that allows you to use either.
You’ll need to use macOS’ System Preferences menu to tell macOS to use this audio port for sound input, rather than an internal device like your built-in mic.
Using Line In Audio Input Devices On macOS
As we’ve mentioned, modern Mac devices only have a single audio jack that you can use for input and output devices alike. To use it for line-in audio input, you’ll need to access your macOS System Preferences.
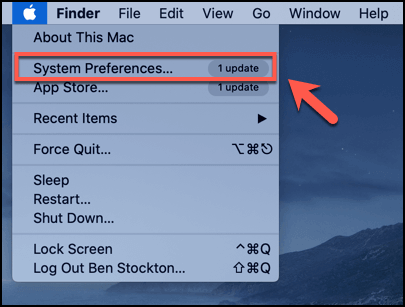
- To do this, click the Apple icon in the top-left of your Mac display. From there, click System Preferences. You can also click the System Preferences icon from the Dock to launch it instead.

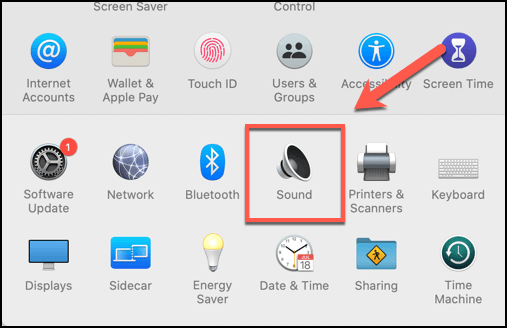
- In the System Preferences window, click the Sound icon to enter your sound settings on macOS.

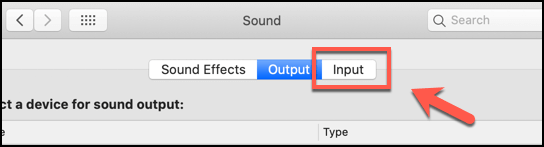
- By default, the Sound window will default to the Output tab. You’ll want to click on the Input tab to change your audio line-in settings.

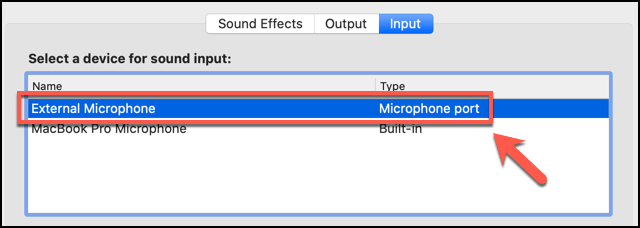
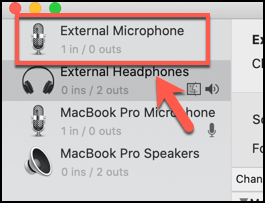
- To start using your line-in device, you’ll need to switch to this as your audio input device in the Input tab. This may look different, depending on your model of Mac device. On a 2019 MacBook, for instance, an external microphone is detected using the Microphone port, but this may be listed as an Audio line-in port on older devices.
macOS may also have switched to this device automatically, but if it hasn’t, click on the device to select it in your Select a device for sound input list.

Adjusting Line In Audio Input Devices On macOS
With your external audio line-in input device activated, you can begin using it. However, before you do that, you may wish to adjust the volume, as well as other settings such as the audio sample rates.
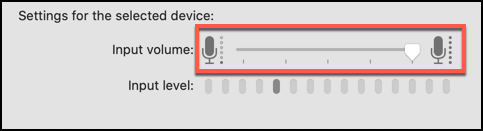
The input volume settings are shown just beneath the Select a device for sound input list in your Sound settings menu. You can access this by clicking the Apple icon > System Preferences > Sound > Input.
- The Input volume slider allows you to change the volume of your inputted sound. Reducing the volume on an external microphone, for instance, would reduce how loud any recorded sound would be. Use your trackpad or mouse to move the slider left to reduce the volume or right to increase it. Any detected sounds will appear in visual form in the Input level bar below it.

- You can also use the Audio MIDI Setup app to make more advanced changes to your external audio input devices. This is a core macOS app, which you can find by clicking the Launchpad icon on your Dock, clicking the Other folder, then pressing the Audio MIDI Setup icon to launch the app.

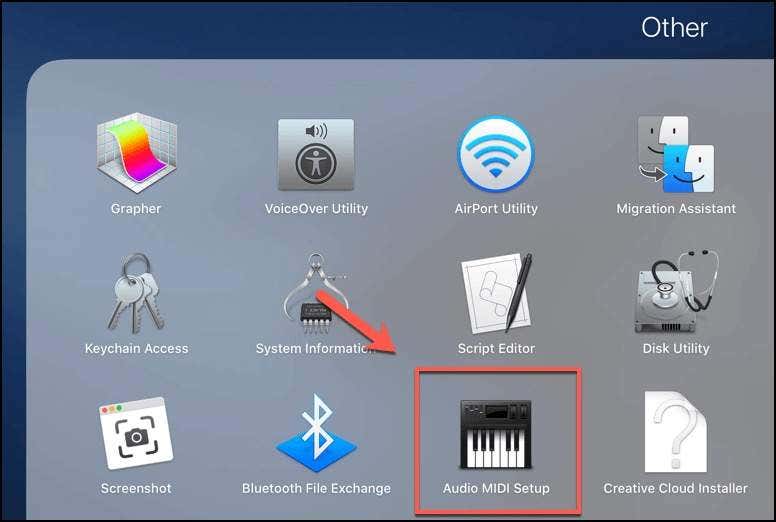
- To change your audio line-in settings, click the external device in the list on the left of the Audio MIDI Setup screen.

- To the right, you’ll see various audio options. You can change the audio sample rate (shown in hertz) under the Format drop-down menu. You can also change the input volume of your device here, under the Master Stream section. Use your mouse or trackpad to move the slider left to decrease or right to increase.

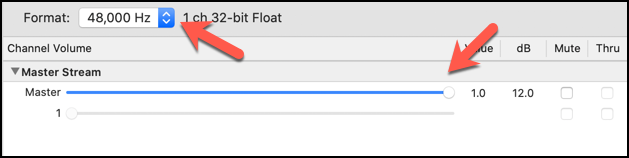
You’ll be able to see the current volume value (listed in decibels), as well as the input volume (a decimal figure, up to a maximum of 1) next to the Master volume slide for your device.
You may also have additional controls and settings available to you, depending on the type of device you’re using. Certain audio input devices may also come with their own control software, allowing you to further calibrate your input settings.
Using External Devices on Modern macOS Devices
There’s no guarantee that the headphone jack will remain a built-in feature in future Macs, but while it’s still there, you can use it to connect external audio input devices without needing an expensive adapter. You might want to use it to record using two different microphones in GarageBand, for instance.
You can also use the line-in audio jack to record an instrument in macOS. If you’re interested in music production, the sky’s the limit. Let us know your uses for external audio line-in devices in the comments section below.